
Category: Arc Raiders (page 1 of 1)

ARC Raiders Furtive Meetings Quest Guide: Locations, Strategy, and Best Loot Farming Tips

In ARC Raiders, every successful raid comes down to preparation, precision, and knowing when to extract. Among the game’s more challenging objectives, the Furtive Meetings quest stands out as a high-risk, high-reward mission that can significantly boost your progression. If you’re aiming to farm valuable ARC Raiders Items while sharpening your survival skills, this quest is one you can’t afford to ignore.

In this complete guide, we’ll break down how the Furtive Meetings quest works, where to find all locations, and the best strategies to complete it safely.

What Is the Furtive Meetings Quest in ARC Raiders?

The Furtive Meetings quest is a multi-objective mission set in the dangerous region of Stella Montis. Like many activities in ARC Raiders, it follows the PvPvE extraction format, meaning you must survive both AI enemies and other players while completing your objectives.

To complete the quest, you must:

·Locate three hidden meeting spots

·Interact with each location

·Retrieve a key quest item

·Successfully extracted in the same run

Failing to extract means losing all progress, including your collected loot and potentially your equipped gear. This makes the mission especially punishing but equally rewarding.

All Furtive Meetings Locations Explained

The biggest challenge in this quest is locating the hidden meeting points. They are not clearly marked, which often leads to confusion and wasted time.

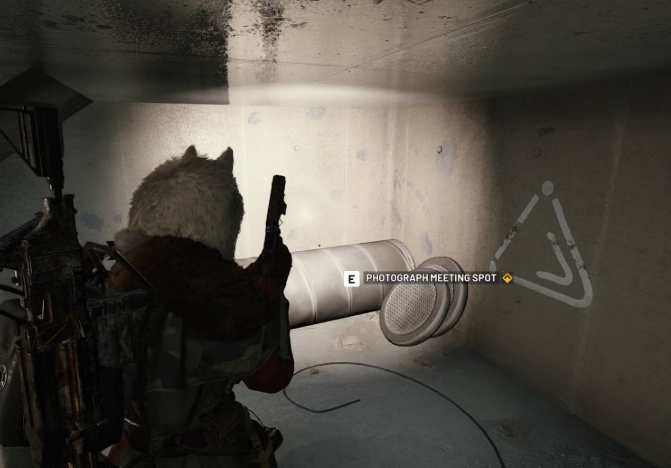
1. Medical Research Area (Southwest)

·Located beneath a staircase

·Look for a triangular symbol on the wall

·Interact to log the meeting point

This is often the safest starting point and sets up a clean route through the rest of the map.

2. Robotic Sandbox B (Near Seed Vault)

·Found near a ventilation shaft

·Hidden inside a machinery room

·Marked by graffiti and climbable structures

This area is more contested, so approach carefully and avoid unnecessary noise.

3. Cultural Archives Staircase

·Located in a tunnel near the Seed Vault

·The final objective includes loading a container

·Contains the “Secret Meeting Info” quest item

Once you collect this item, your objective shifts immediately to extraction.

Why This Quest Matters for ARC Raiders Items

Let’s be clear-the Furtive Meetings quest is one of the most efficient ways to earn high-tier ARC Raiders Items.

Upon completion, players can receive:

·A powerful Legendary weapon (Aphelion)

·Valuable crafting resources

·High-tier loot for future upgrades

Unlike random farming runs, this quest provides consistent and guaranteed rewards, making it ideal for players who want to progress faster without relying entirely on RNG.

Best Strategy to Complete Furtive Meetings Safely

Many players fail this quest because they treat it like a standard loot run. That approach doesn’t work here. Success requires discipline and planning.

1. Use a Lightweight Loadout

Bring only essential gear:

·Short-range weapons for tight interiors

·Minimal equipment to reduce risk

·A secure inventory slot for the quest item

Mobility is more important than firepower in Stella Montis.

2. Prioritize Route Efficiency

Planning your route before deployment is critical:

·Start at Medical Research

·Move to Robotic Sandbox B

·Finish at Cultural Archives

This linear path reduces backtracking and limits your exposure to danger.

3. Avoid Unnecessary Fights

Stella Montis is a PvP hotspot. Engaging every enemy is a mistake.

·Avoid gunfights when possible

·Use stealth and environmental cover

·Focus only on completing objectives

Every unnecessary fight increases your chances of failure.

4. Extract Immediately After Completion

This is where most players fail.

Once you obtain the Secret Meeting Info, your mission is complete-but only if you extract successfully.

·Do not linger for extra loot

·Avoid high-traffic zones

·Head straight to extraction

Greed is the number one cause of failure in this quest.

How This Quest Supports Blueprint Progression

Blueprints are essential for crafting advanced gear and improving your long-term performance. While this quest doesn’t directly guarantee blueprint drops, it plays a major role in progression.

By completing Furtive Meetings, you can:

·Earn high-value loot to trade or use

·Improve your overall farming efficiency

·Increase your survivability in tougher raids

Some players choose to buy ARC Raiders Blueprints to accelerate their progress. However, consistently completing quests like this can reduce that need by providing steady resources and better gear opportunities.

Risk vs Reward: Is It Worth It?

There’s no denying the difficulty of this mission:

·All objectives must be completed in one run

·The map layout is complex

·PvP encounters are frequent

However, the rewards far outweigh the risks.

Compared to standard farming:

·Higher guaranteed loot value

·Faster progression speed

·Better access to high-tier equipment

For players serious about collecting ARC Raiders Items, this quest is one of the most efficient methods available.

Common Mistakes to Avoid

Even experienced players can struggle with Furtive Meetings. Avoid these common pitfalls:

·Poor route planning: Leads to wasted time and increased exposure

·Over-engaging enemies: Drains resources and raises risk

·Over-looting: Delays extraction and increases chances of death

·Weak preparation: Inadequate gear reduces survivability

Learning from these mistakes will dramatically improve your success rate.

Final Thoughts

The Furtive Meetings quest perfectly captures what makes ARC Raiders so engaging: high stakes, meaningful rewards, and the constant tension of risk versus reward.

If you want to succeed:

·Learn the map and plan your route carefully

·Keep your loadout light and efficient

·Focus on objectives, not combat

·Extract as soon as the mission is complete

Whether you’re farming valuable ARC Raiders Items or looking for ways to buy ARC Raiders Blueprints to enhance your gear, mastering this quest will give you a clear advantage.

In ARC Raiders, survival isn’t about brute force-it’s about smart decisions. And in Furtive Meetings, every decision counts.
ARC Raiders: How to Find Traffic Tunnels in Blue Gate

Blue Gate, ARC Raiders’ mid-tier mountainous map, is a treasure trove of high-value loot, intense PvP encounters, and hidden underground networks. Among its most critical features are the Traffic Tunnels-subterranean passages that offer stealthy movement, access to rare loot caches, and a strategic edge over both ARC forces and rival raiders.

Unlocked after 18 completed matches, Blue Gate’s dual-layer design blends open surface areas with dense underground complexes, and the Traffic Tunnels serve as the backbone of its subterranean network. Whether you’re on the “Outstanding Balance” quest or hunting for premium gear, mastering how to find these tunnels is key to surviving and thriving in this high-difficulty zone. This will help you obtain more ARC Raiders BluePrints, items, and other rewards.

First: Understand the Role of Traffic Tunnels in Blue Gate

Before diving into navigation tips, it’s essential to grasp why Traffic Tunnels matter. Unlike Blue Gate’s other underground passages, these tunnels are purpose-built for movement-connecting key surface locations like the Gate Approach Checkpoint, Pilgrim’s Peak, and Warehouse Complex.

Traffic Tunnels offer a stark contrast to Blue Gate’s open surface terrain. Their confined spaces favor close-quarters combat (CQC), while their dark, shadowy corridors let you flank enemies, evade ARC patrols, and avoid PvP hotspots. They also house hidden loot, including quest items like Dodger’s Stash, making them a must-explore for any raider.

These tunnels are part of the larger Tubes Network-a raider-built underground transport system expanded to reach Blue Gate, bearing battle scars from countless ARC and raider conflicts. Knowing their layout and entry points turns a risky raid into a strategic victory.

Key Entry Points: How to Locate Traffic Tunnel Entrances

Blue Gate’s Traffic Tunnels are not marked on the in-game map, so you’ll need to rely on environmental cues and landmark recognition to find their entrances. Below are the most reliable entry points, organized by surface location for easy navigation.

1. Central Checkpoint (Primary Entry)

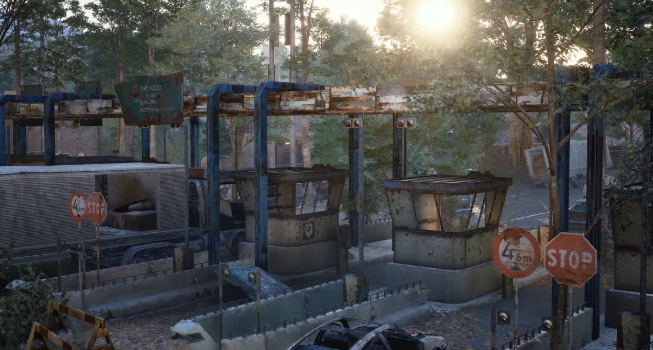
The most accessible entry to the Traffic Tunnels is at Blue Gate’s Central Checkpoint-a vehicle graveyard-like area near the map’s center. Look for a set of giant metal doors flanked by rusted vehicles and ARC debris; this is the main entrance to the tunnel network.

This entrance is unguarded but often busy with other raiders, so approach cautiously. The doors are slightly ajar, emitting a faint hum and dim light-dead giveaways that you’ve found the right spot. Step through to enter the main Traffic Tunnel corridor.

2. Pilgrim’s Peak Zipline Access

For raiders approaching from the north, Pilgrim’s Peak (a towering antenna structure) offers a secondary entry to the Traffic Tunnels. Locate the zipline near the peak’s base-this zipline connects to a small tunnel that feeds directly into the Traffic Tunnels’ northwest section.

This entry is ideal for players on the “Outstanding Balance” quest, as it leads straight to the area where Dodger’s Stash is hidden. The small tunnel is narrow and dark, so keep your flashlight on and watch for ARC ambushes.

3. Warehouse Complex Maintenance Hatch

On the map’s southeast side, the Warehouse Complex (home to the Red Room puzzle) features a hidden maintenance hatch that opens into the Traffic Tunnels. Look for a rusted metal hatch near the warehouse’s back wall, marked by a yellow caution sign and loose wiring.

This entry is less crowded than the Central Checkpoint but requires solving a simple color puzzle to access the hatch. Interact with the nearby console to unlock the hatch-this also grants access to mid-tier loot caches inside the tunnel.

4. Vertical Shafts (Emergency Access)

Blue Gate’s vertical shafts-scattered across the map’s surface-offer emergency access to the Traffic Tunnels. These narrow, ladder-lined shafts connect the surface to the underground network, making them perfect for quick repositioning or escaping danger.

Look for shafts near ridgelines and forested areas; they’re marked by metal ladders and faint light from below. While these shafts don’t lead directly to the main tunnel corridor, they connect to smaller passages that feed into the Traffic Tunnels.

Environmental Cues to Avoid Getting Lost

Once inside the Traffic Tunnels, it’s easy to get disoriented-their dark, winding corridors all look similar. Use these environmental cues to stay on track and find your way to key areas.

First, follow the faint blue lights along the tunnel walls. These lights mark the main Traffic Tunnel path, leading to major loot areas and exit points. They’re dim but consistent, even in the darkest sections of the tunnels.

Second, watch for blue tarps and makeshift campsites. These are raider-made markers, often indicating nearby loot or quest items (like Dodger’s Stash, which is hidden under a blue tarp in the tunnel’s northwest corner). They also signal safe zones where you can rest and reload.

Finally, listen for ambient sounds. The Traffic Tunnels echo with the hum of distant ARC machinery and the scuttle of enemy patrols. Follow the sound of loot crates (a faint clinking) to find hidden caches, or use the echo to avoid nearby threats.

Tips for Navigating Traffic Tunnels Safely

Finding the Traffic Tunnels is only half the battle-surviving them requires strategy. Blue Gate’s tunnels are high-risk, high-reward, with ARC patrols, rival raiders, and booby traps lurking around every corner.

Prioritize Stealth Over Speed

The tunnels’ confined spaces amplify noise, so move slowly and crouch to avoid alerting enemies. Use shadows to your advantage-stay close to tunnel walls and avoid stepping on loose debris, which can give away your position.

Equip a silencer if you have one; gunfire in the tunnels echoes loudly, attracting raiders from across the network. If you encounter an ARC drone or rival, take them down quickly and quietly to avoid drawing more attention.

Bring the Right Gear

A flashlight is non-negotiable-many tunnel sections are pitch-black, and you’ll miss key cues (like blue tarps or loot crates) without it. A medkit and extra ammo are also essential, as CQC encounters can turn deadly quickly.

For players targeting high-value loot, bring a Communication Tower Key or Confiscation Room Key. These keys unlock restricted tunnel sections, including the Confiscation Room-a vault filled with epic gear and rare blueprints.

Plan Your Exit Route

Before entering the tunnels, identify your exit strategy. Note the location of vertical shafts or main entrances, so you can escape quickly if you’re ambushed. The tunnels are easy to get trapped in, so never venture too deep without a clear way out.

If you’re on a quest (like “Outstanding Balance”), mark your exit on the map before entering. This ensures you can extract quickly after collecting quest items, avoiding unnecessary risk.

Final Thoughts: Mastering Blue Gate’s Traffic Tunnels

Blue Gate’s Traffic Tunnels are more than just underground passages-they’re a strategic tool for raiders looking to outmaneuver enemies and secure top-tier loot. By using the Central Checkpoint, Pilgrim’s Peak, and Warehouse Complex entry points, you can easily find these tunnels on every raid.

Remember to follow environmental cues, prioritize stealth, and plan your route. Whether you’re completing a quest, farming loot, or evading PvP, the Traffic Tunnels offer a tactical advantage that can turn the tide of any raid. In addition, MMOEXP offers you a wider selection of cheap ARC Raiders Materials, items, and more.

With these tips, you’ll go from wandering Blue Gate’s surface to navigating its underground network like a veteran. The Traffic Tunnels may be dark and dangerous, but they’re also the key to unlocking Blue Gate’s most valuable rewards-so gear up, stay alert, and start exploring.

ARC Raiders:How to Acquire the Expired Respirator

In the vast landscape of Arc Raiders, finding the right resources can be crucial for survival. One essential item is the Expired Respirator, which offers both practical benefits and financial gain. It can be transformed into Rubber Parts and Fabric or sold for 640 coins, making it a valuable asset for any aspiring player.

Understanding the Rarity of the Expired Respirator

The Expired Respirator is classified as a rare item, meaning it’s not easily found in abundance. These respirators are primarily located in Medical facilities across the game world. Players should focus their searches in the Buried City, where the chances of finding these items are highest.

Top Locations to Find Expired Respirators

Buried City

The Buried City is the prime location for hunting down the Expired Respirator. Notable areas like Piazza Arbusto and Plaza Rosa contain pharmacies packed with medical supplies, making them worthwhile stops during your exploration.

Hospital Building

Your primary target should be the Hospital within the Buried City, a multi-story venue filled with potential loot.

Explore All Floors:Don’t skip any levels. Check drawers, lockers, and locked rooms requiring the Hospital Key. Thorough looting increases your chances of discovering an Expired Respirator.

Stay Cautious:Watch out for traps and turrets in various rooms that could hinder your search and cause damage.

Effective Looting Strategy

To safeguard any found respirators, stash them in your Safe Pocket immediately. This ensures you won’t lose valuable items when you extract at the station beneath the hospital.Upgrade your arsenal instantly—choose MMOexp for reliable ARC Raiders Items and unstoppable gameplay.

If you’ve found one Expired Respirator but need more, consider heading to the Research building after thoroughly looting the hospital to increase your likelihood of finding additional supplies.

Night Raid Map Condition

Buried City also features a Night Raid condition, which can significantly enhance the amount of loot available. This is particularly advantageous when hunting for high-rarity items like the Expired Respirator.

Additionally, don’t overlook other locations such as Dam Battlegrounds. Investigate the medical section in the Research & Administration building, near the locker room, where you can often find valuable medical items.From casual runs to high-stakes battles, MMOexp has the cheap ARC Raiders Materials you need to thrive.

Additional Tips for Locating Expired Respirators

Timing Is Key:Loot the Hospital early to beat the competition. Familiarity with the map lets you bypass lower-yield locations and focus on the most rewarding areas.

Team Coordination:If you’re playing with friends, strategize your exploration for added safety against nearby enemies.

Caution During Extraction:Be vigilant while extracting your items, as enemy players may be waiting for loot runs.

Successfully finding the Expired Respirator in Arc Raiders relies on strategic planning and knowledge of locations. By emphasizing your efforts in the Hospital of Buried City and utilizing Night Raid conditions, you will significantly improve your loot efficiency.

Keep these tactics in mind and be aware of potential dangers to not only increase the number of Expired Respirators you collect but also to gather a wealth of other valuable items along your journey.